はじめに
前回の記事で紹介しました、非接触ICカードリーダー/ライター SONY PaSoRi RC-S300 を使って FeliCa Lite-S カードを操作するモジュール、「JavaScript FeliCa Lite-S操作モジュール」を使って、Web APIs USBDevice を説明していきたいとおもいます。
注意事項
私自身 USBDevice API を使うのが初めてですし RC-S300 以外の機種を操作接続した経験がないので、他の機器でもここでの説明が当てはまるのかは保証できません。
自分なりの勝手な推論(あてずっぽう?)で、こんな感じかなでやっている部分も多々ありますので、参考程度に留めていただいて、ご自身で再検証されることをおすすめします。
USBDevice API の説明と 非接触ICカードリーダー/ライター SONY PaSoRi RC-S300 の説明が混在している場合がありますので、ご了承下さい。
そもそも Web API ってなに?
複雑なコードを書かなくても、Web API を使えば簡略化されたコードで書ける、便利なインターフェイスです。
普段 JavaScript で書いているコードで、ドキュメントを操作するためによく利用される「DOM」も「DOM(Document Object Model) API」で API の一つです。他にもサーバーとの通信に使われる Fetch や XMLHttpRequest 等も API の一種です。
MDN ウェブ開発を学ぶ > JavaScript > クライアントサイド Web API > Web API の紹介
MDN ウェブ開発を学ぶ > JavaScript > クライアントサイド Web API
「JavaScript FeliCa Lite-S操作モジュール」で使っている USBDevice
USBDevice を使うとクライアントのUSBデバイスとペアリングすることができ、インターフェイスによりUSBデバイスを操作することができます。
MDN References > Web APIs > USBDevice
動作イメージ
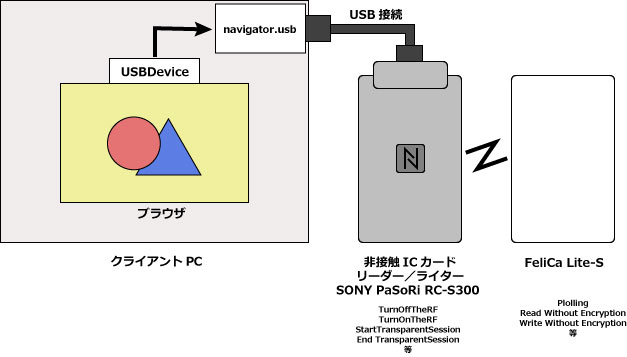
クライアントPCのブラウザから、USBDevice を使用してUSB接続されている、非接触ICカードリーダー/ライター SONY PaSoRi RC-S300 を操作する。
USBDevice がコネクトするのはUSB接続されている SONY PaSoRi RC-S300 です。FeliCa カードへはSONY PaSoRi RC-3S00 を経由してアクセスします。
USBに接続された機器の操作コマンドとしては、SONY PaSoRi RC-S300 を操作するためのコマンド ( TurnOffTheRF / TurnOnTheRF / StartTransparentSession / EndTransparentSession 等 ) と、FeliCa Lite-S を操作するための FeliCa コマンド (Polling / Read Without Encryption / Write Without Encryption 等 ) の2種類のコマンドがあります。FeliCa コマンドは RC-300 の CommunicateThruEx コマンドにより ターゲットの FeliCa カードへ送信されます。
USBに接続されている機器にアクセスしてみましょう。
USB機器にアクセスするには、navigator.usb オブジェクトによって USBDevice インスタンスを取得します。
MDN References > Web APIs > USB
USBDevice インスタンスを取得する方法は、USB.requestDevice() と USB.getDevices() の2つがあります。
どちらのメソッドもプロミスで USBDevice インスタンスが返されます。
USB.requestDevice() と USB.getDevices() の違いは、USB.getDevices() はアタッチ済みの USB 機器全てのインスタンスが取得でき、USB.requestDevice() はクライアントユーザーが選択した USB機器のみのインスタンスを取得します。
まずは、USB.requestDevice() で USBDevice インスタンスを取得します。
引数の filter については、後ほど説明します。
MDN References > Web APIs > USB > USB.requestDevice()
下記のコマンドを実行すると、ペアリング可能なUSBの一覧が表示されます。
const usbDevice = await navigator.usb.requestDevice( {filters:[{}]} ) ;USB機器にアクセスする際の注意
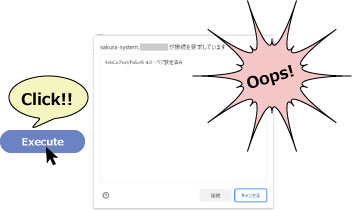
但し、このコマンドを実行するには、クライアントユーザーの明示的なアクションが必須となります。
つまり、ボタン等をクライアントユーザーがクリックするなど、明示的なアクションを起こして、実行しなければなりません。
次のように、ユーザーの明示的なアクションがない load イベントで自動で実行するとエラーとなります。
	window.addEventListener('load', async () => {
		const usbDevice = await navigator.usb.requestDevice( {filters:[{}]} ) ;
		return;
	});
// Uncaught (in promise) DOMException: Failed to execute 'requestDevice' on 'USB':
//  Must be handling a user gesture to show a permission request.
Uncaught (in promise) DOMException: Failed to execute ‘requestDevice’ on ‘USB’: Must be handling a user gesture to show a permission request.
(訳)「許可リクエストを表示するには、ユーザージェスチャを処理している必要があります。」
USB機器への接続リクエスト
それを踏まえて簡単なコードを作成しました。
<!DOCTYPE HTML PUBLIC "-//W3C//DTD HTML 4.01 Transitional//EN"
"http://www.w3.org/TR/html4/loose.dtd">
<html>
<meta http-equiv="content-type" content="text/html; charset=utf-8">
<head>
<title>USBDevice Test</title>
<style>
.textCenter { text-align: center ; }
</style>
</head>
<body>
<h3>
<div class="header-title textCenter">
USBDevice Test
</div>
</h3>
<div class="mainArea">
<div class="button textCenter">
<button id="exe">Execute</button>
</div>
<br><br>
<div class="message">
<div id="message-title" class="message-title" style="display: inline;"></div><br>
<div id="message" class="message-info" style="display: inline;"></div>
</div>
</div>
<script type='module'>
let messageTitle = document.querySelector( '#message-title' ) ;
let message = document.querySelector( '#message' ) ;
let exe = document.querySelector( '#exe' ) ;
exe.addEventListener( 'click', async () => {
const usbDevice = await navigator.usb.requestDevice( { filters: [{}] } ) ; // USB機器への接続リクエスト
console.log( usbDevice) ;
return;
});
</script>
</body>
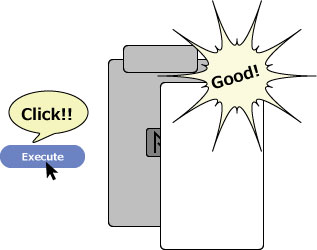
</html>「Execute」ボタンが一つのシンプルな画面です。

ボタンをクリックすると navigator.usb.requestDevice が実行されます。
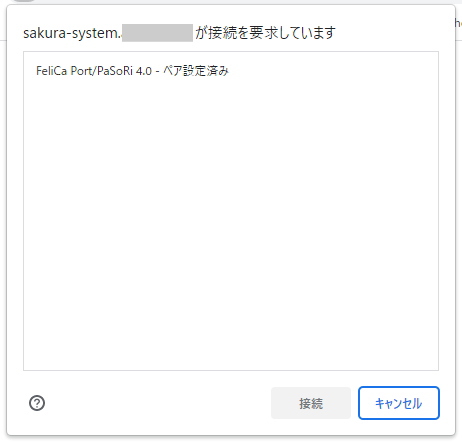
ペアリングフローと呼ばれる、ウィンドウが開かれて接続可能なUSB機器のリストが表示されます。
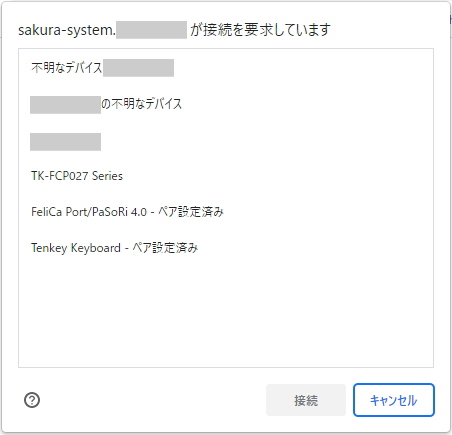
キーボードや PaSoRi やテンキーボード等、接続されている機器から「FeliCa Port/PaSoRi 4.0」をクリックして「接続ボタン」をクリックします。
USBDevice インスタンスが取得できますので、その内容がコンソールに表示されます。
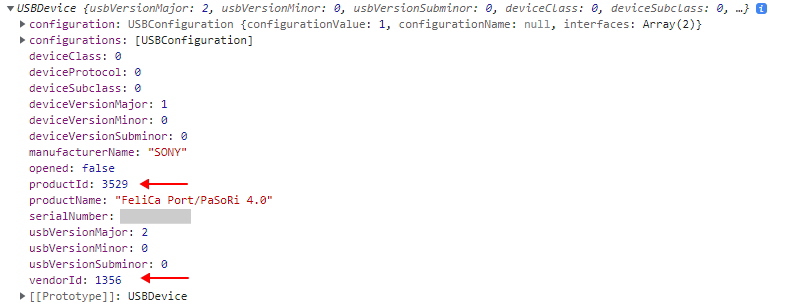
USBDevice のインスタンスが正常に取得できています。
非接触ICカードリーダー/ライター SONY PaSoRi RC-S300/P のプロダクトID が「3529」
SONY のベンダーIDが「1356」であることがわかります。
調べたところ、同種の型番の RC-S300/S のプロダクトIDは「3528」となっています。
今回は、非接触ICカードリーダー/ライター SONY PaSoRi RC-S300 シリーズだけと接続したいので、先程のコードに少し手をいれてみます。
USB.requestDevice() メソッド引数にフィルターを設定します。
		const usbDevice = await navigator.usb.requestDevice({
			filters: [
				{ vendorId : 1356 , productId: 3528 },	// SONY PaSoRi RC-S300/S
				{ vendorId : 1356 , productId: 3529 },	// SONY PaSoRi RC-S300/P
			]
		}) ;
ペアリングフローには、フィルターにより指定したベンダーIDとプロダクトIDに該当するUSB機器だけが選択可能となりました。
これでUSBDevice のインスタンスが入手できたので、デバイスのオープン処理をおこないたいところですが、ここで少し使いやすくしておきましょう。
このままですと、「Execute」ボタンをクリックするたびに、ペアリングフローが表示されて、ペアリング先を指定しなければなりません。
そこで、USB.getDevices() の出番です。
MDN References > Web APIs > USB > USB.getDevices()
USB.getDevices() は既にアタッチされている USBDevice のインスタンスを取得することができるので、最初にUSB.getDevices() でインスタンス取得できなければアタッチされていないとして、USB.requestDevice() のペアリングフローでUSB機器を選択してインスタンスを取得します。
リクエストデバイス用のフィルターを const で定義して、処理をイベントリスナーから取り出しています。
<!DOCTYPE HTML PUBLIC "-//W3C//DTD HTML 4.01 Transitional//EN"
"http://www.w3.org/TR/html4/loose.dtd">
<html>
<meta http-equiv="content-type" content="text/html; charset=utf-8">
<head>
	<title>USBDevice Test</title>
	<style>
		.textCenter { text-align: center ; }
	</style>
</head>
<body>
	<h3>
		<div class="header-title textCenter">
			USBDevice Test
		</div>
	</h3>

    <div class="mainArea">
		<div class="button textCenter">
			<button id="exe">Execute</button>
		</div>
		<br><br>
		<div class="message">
			<div id="message-title" class="message-title" style="display: inline;"></div><br>
			<div id="message" class="message-info" style="display: inline;"></div>
		</div>
	</div>

<script type='module'>

	let messageTitle = document.querySelector( '#message-title' ) ;
	let message = document.querySelector( '#message' ) ;
	let exe = document.querySelector( '#exe' ) ;
	let usbDevice = '' ;

	const DeviceFilter = [				// USB機器ペアリングフィルター
		{ vendorId : 1356 , productId: 3528 },	// SONY PaSoRi RC-S300/S
		{ vendorId : 1356 , productId: 3529 },	// SONY PaSoRi RC-S300/P
	] ;

	exe.addEventListener( 'click', async () => {
		await usbDeviceControl() ;
		console.log( usbDevice ) ;
		return;
	});

	var usbDeviceControl = async () => {
		const ud = await navigator.usb.getDevices() ;	// ペアリング設定済みデバイスのUSBDeviceインスタンス取得
		console.log( ud ) ;
		let peared = 0 ;
		if ( ud.length > 0 ) {
			for( let dev of ud ) {
				const td = DeviceFilter.find( (fildev) => dev.vendorId == fildev.vendorId && dev.productId == fildev.productId ) ;
				if ( td !== undefined ) {
					++peared ;
					usbDevice = dev ;
				}
			}
		}
		console.log( usbDevice ) ;
		if ( peared != 1 ) {
			usbDevice = await navigator.usb.requestDevice( { filters: DeviceFilter } ) ;	// USB機器をペアリングフローから選択しデバイスのUSBDeviceインスタンス取得
		}
		return;
	}

</script>
</body>
</html>
「ペアリング設定済みデバイスの USBDevice インスタンス取得」部分ゴチャゴチャとしていますが、getDevice メソッド
const ud = await navigator.usb.getDevices() ;
で、返される USBDevice のインスタンスは、ペアリングされた全ての USBDevice のインスタンスが、配列で返りますので、ペアリングされたUSB機器のなかから、フィルターに合致するUSB機器の USBDeviceのインスタンスを取得するようにします。
但し、フィルターに合致するUSB機器が複数ある場合は、requestDevice で、クライアントユーザーにUSB機器を指定してもらうようにします。もちろん、ペアリング済みのUSB機器がない場合も同様です。
これで、ペアリング周りの処理がスマートになりました。
USB機器のインターフェイス番号とエンドポイントを求める。
USBDevice インスタンスのプロパティから、データの受け渡しに必要なインターフェイス番号とエンドポイントを求めます。
USBDevice のインスタンスの内容をコンソールに表示したものです。

USBDevice の configuration プロパティから求めます。
configuration.configurationValue を添え字にして、interfaces 配列を求めます。図①
求められた interfaces 配列の interfaceNumber プロパティがインターフェイス番号となります。図②
エンドポイントは入出力の2つあります。
interfaces 配列の alternate.endpoints 配列に入出力のエンドポイントが設定されています。
direction が 「in」は入力用「out」は出力用、enpointNumber がエンドポイント、packetSize が入出力パケットサイズとなります。図③④
<!DOCTYPE HTML PUBLIC "-//W3C//DTD HTML 4.01 Transitional//EN"
"http://www.w3.org/TR/html4/loose.dtd">
<html>
<meta http-equiv="content-type" content="text/html; charset=utf-8">
<head>
	<title>USBDevice Test</title>
	<style>
		.textCenter { text-align: center ; }
	</style>
</head>
<body>
	<h3>
		<div class="header-title textCenter">
			USBDevice Test
		</div>
	</h3>

    <div class="mainArea">
		<div class="button textCenter">
			<button id="exe">Execute</button>
		</div>
		<br><br>
		<div class="message">
			<div id="message-title" class="message-title" style="display: inline;"></div><br>
			<div id="message" class="message-info" style="display: inline;"></div>
		</div>
	</div>

<script type='module'>

	let messageTitle = document.querySelector( '#message-title' ) ;
	let message = document.querySelector( '#message' ) ;
	let exe = document.querySelector( '#exe' ) ;
	let usbDevice = '' ;
	let usbConfiguration = {} ;

	const DeviceFilter = [
		{ vendorId : 1356 , productId: 3528 },	// SONY PaSoRi RC-S300/S
		{ vendorId : 1356 , productId: 3529 },	// SONY PaSoRi RC-S300/P
	] ;

	exe.addEventListener( 'click', async () => {
		await usbDeviceControl() ;
		console.log( usbDevice ) ;
		return;
	});

	var usbDeviceControl = async () => {
		const ud = await navigator.usb.getDevices() ;						// ペアリング設定済みデバイスのUSBDeviceインスタンス取得
		console.log( ud ) ;
		let peared = 0 ;
		if ( ud.length > 0 ) {
			for( let dev of ud ) {
				const td = DeviceFilter.find( (fildev) => dev.vendorId == fildev.vendorId && dev.productId == fildev.productId ) ;
				if ( td !== undefined ) {
					++peared ;
					usbDevice = dev ;
				}
			}
		}
		console.log( usbDevice ) ;
		if ( peared != 1 ) {
			usbDevice = await navigator.usb.requestDevice( { filters: DeviceFilter } ) ;	// USB機器をペアリングフローから選択しデバイスのUSBDeviceインスタンス取得
		}

		usbConfiguration.confValue = usbDevice.configuration.configurationValue ;
		usbConfiguration.interfaceNum = usbDevice.configuration.interfaces[ usbConfiguration.confValue ].interfaceNumber ;	// インターフェイス番号
		let ep = getEndPoint( usbDevice.configuration.interfaces[ usbConfiguration.confValue ] , 'in' ) ;	// 入力エンドポイントを求める
		usbConfiguration.endPointInNum = ep.endpointNumber ;												// 入力エンドポイント
		usbConfiguration.endPointInPacketSize = ep.packetSize ;												// 入力パケットサイズ
		ep = getEndPoint( usbDevice.configuration.interfaces[ usbConfiguration.confValue ] , 'out' ) ;		// 出力エンドポイントを求める
		usbConfiguration.endPointOutNum = ep.endpointNumber ;												// 出力エンドポイント
		usbConfiguration.endPointOutPacketSize = ep.packetSize ;											// 出力パケットサイズ
		console.log( usbConfiguration ) ;

		return;
	}

//	USBデバイス Endpoint の取得
	var getEndPoint = ( argInterface, argVal ) => {
		let retVal = false ;
		for( const val of argInterface.alternate.endpoints ) {
			if ( val.direction == argVal ) { retVal = val ; }
		}
		return retVal ;
	}

</script>
</body>
</html>
取得結果は以下のようになります。

インターフェイス番号とエンドポイントの求め方は、私が勝手にこんな感じじゃないかなと求めているので、これが正解かって問われると、返答に苦しみます。
次回
今回は、コネクトするところまでで、おしまいです。
次回は、USB機器とのデータの送受信を説明する予定です。
FeliCa Lite-S操作モジュール ArukasNFCLiteS
「FeliCa Lite-S操作モジュール ArukasNFCLiteS」の紹介
JavaScript からこのモジュールを利用すれば、非接触ICカードリーダー/ライター SONY PaSoRi RC-S300へのコネクト・ポーリング・FeliCa Lite-S カードへの読み書きが簡単にできます。
動作確認は、
OS:Windows10 Pro・Windows10 Home
ブラウザ: Chrome・Edge
で行っています。
動作ハード確認は、Atom x5-Z8350 という低スペック PC でも動作しました。
ダウンロード
ダウンロードにあたり下記事項を確認してダウンロードしてください。
解凍後には必ず「JavaScript FeliCa Lite-S操作モジュール.txt」を一読し、免責・禁止事項・注意事項をご確認ください。交通系カードや電子マネーカードを使って、データが壊れたとかの責任は一切受け付けません。
・免責
当モジュール及びサンプルプログラムによるいかなる損害も、有限会社さくらシステム及び製作者はその責を一切負いません。
・禁止事項
有限会社さくらシステム及び製作者に許可なく、あらゆるメディア・コンテンツに再掲することを禁じます。
・注意事項
当モジュール及びサンプルプログラムは、技術検証を目的として作成されていますので、負荷試験を始めとする製品化を行うための基準を満たすための試験を一切行っておりませんので、予期せぬ結果を招く場合があります。
その場合であっても、上記免責事項により有限会社さくらシステム及び製作者はその責を一切負いません。
使用方法
ダウンロードした zip ファイルを解凍すると NFC フォルダが作成されますので、適当なWebサーバへアップロードしてください。
Web APIs USBDevice に対応したブラウザからサンプルへアクセスすることで、動作を確認することができます。
詳しくは、NFC フォルダ内の「JavaScript FeliCa Lite-S操作モジュール.txt」を参照してください。