
はじめに
前回の記事で紹介しました、非接触ICカードリーダー/ライター SONY PaSoRi RC-S300 を使って FeliCa Lite-S カードを操作するモジュール、「JavaScript FeliCa Lite-S操作モジュール」を使って、Web APIs USBDevice を説明していきたいとおもいます。
注意事項
私自身 USBDevice API を使うのが初めてですし RC-S300 以外の機種を操作接続した経験がないので、他の機器でもここでの説明が当てはまるのかは保証できません。
自分なりの勝手な推論(あてずっぽう?)で、こんな感じかなでやっている部分も多々ありますので、参考程度に留めていただいて、ご自身で再検証されることをおすすめします。
USBDevice API の説明と 非接触ICカードリーダー/ライター SONY PaSoRi RC-S300 の説明が混在している場合がありますので、ご了承下さい。
そもそも Web API ってなに?
複雑なコードを書かなくても、Web API を使えば簡略化されたコードで書ける、便利なインターフェイスです。
普段 JavaScript で書いているコードで、ドキュメントを操作するためによく利用される「DOM」も「DOM(Document Object Model) API」で API の一つです。他にもサーバーとの通信に使われる Fetch や XMLHttpRequest 等も API の一種です。
MDN ウェブ開発を学ぶ > JavaScript > クライアントサイド Web API > Web API の紹介
MDN ウェブ開発を学ぶ > JavaScript > クライアントサイド Web API
「JavaScript FeliCa Lite-S操作モジュール」で使っている USBDevice
USBDevice を使うとクライアントのUSBデバイスとペアリングすることができ、インターフェイスによりUSBデバイスを操作することができます。
MDN References > Web APIs > USBDevice
動作イメージ

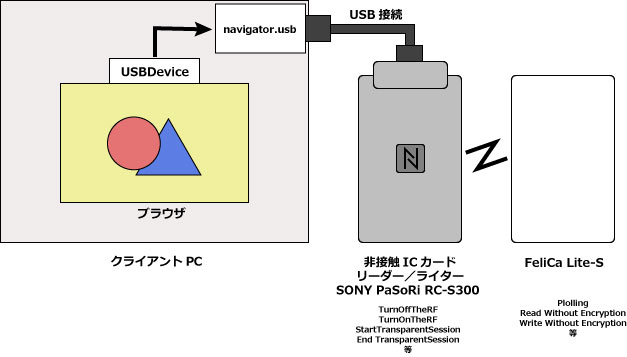
クライアントPCのブラウザから、USBDevice を使用してUSB接続されている、非接触ICカードリーダー/ライター SONY PaSoRi RC-S300 を操作する。
USBDevice がコネクトするのはUSB接続されている SONY PaSoRi RC-S300 です。FeliCa カードへはSONY PaSoRi RC-S300 を経由してアクセスします。
USBに接続された機器の操作コマンドとしては、SONY PaSoRi RC-S300 を操作するためのコマンド ( TurnOffTheRF / TurnOnTheRF / StartTransparentSession / EndTransparentSession 等 ) と、FeliCa Lite-S を操作するための FeliCa コマンド (Polling / Read Without Encryption / Write Without Encryption 等 ) の2種類のコマンドがあります。FeliCa コマンドは RC-S300 の CommunicateThruEx コマンドにより ターゲットの FeliCa カードへ送信されます。
USBに接続されている機器にアクセスしてみましょう。
前回記事で、USB機器にコネクトするところまで説明しました。

USB機器にコネクト後、configurationValue / インターフェイス番号 / エンドポイントを取得しました。
今回は、取得した値を使ってUSB機器とのデータの送受信をおこないます。
USBデバイスのオープン処理
USBデバイスにコネクト後に取得した、configurationValue / インターフェイス番号 を使ってオープン処理をします。
USBDevice.open() で、USBデバイスとのセッションを開始します。
USBDevice.selectConfiguration( configurationValue ) で、USBデバイスの構成を選択します。
USBDevice.claimInterface( インターフェイス番号 ) で、USBデバイスの指定したインターフェイスを排他アクセスに設定します。
//	USB デバイスオープン
	var usbDeviceOpen = async() => {
		await usbDevice.open() ;		// USBデバイスセッション開始
		await usbDevice.selectConfiguration( usbConfiguration.confValue ) ;		// USBデバイスの構成を選択
		await usbDevice.claimInterface( usbConfiguration.interfaceNum ) ;		// USBデバイスの指定インターフェイスを排他アクセスにする
		return ;
	}
MDN References > Web API > USBDevice > USBDevice.open()
MDN References > Web API > USBDevice > USBDevice.selectConfiguration()
MDN References > Web API > USBDevice > USBDevice.claimInterface()
USBデバイスのクローズ処理
USBデバイスのクローズ処理をおこないます。
USBDevice.releseInterface( インターフェイス番号 ) で、USBデバイスの排他アクセスを解放します。
USBDevice.close() で、USBデバイスとのセッションを終了します。
//	USB デバイスクローズ
	var usbDeviceClose = async() => {
		await usbDevice.releaseInterface( usbConfiguration.interfaceNum ) ;		// USBデバイスの指定インターフェイスを排他アクセスを解放する
		await usbDevice.close() ;		// USBデバイスセッション終了

		return ;
	}
MDN References > Web API > USBDevice > USBDevice.releaseInterface()
MDN References > Web API > USBDevice > USBDevice.close()
USBデバイスのオープン・クローズ処理を含めたコード
<!DOCTYPE HTML PUBLIC "-//W3C//DTD HTML 4.01 Transitional//EN"
"http://www.w3.org/TR/html4/loose.dtd">
<html>
<meta http-equiv="content-type" content="text/html; charset=utf-8">
<head>
	<title>USBDevice Test</title>
	<style>
		.textCenter { text-align: center ; }
	</style>
</head>
<body>
	<h3>
		<div class="header-title textCenter">
			USBDevice Test
		</div>
	</h3>

    <div class="mainArea">
		<div class="button textCenter">
			<button id="exe">Execute</button>
		</div>
		<br><br>
		<div class="message">
			<div id="message-title" class="message-title" style="display: inline;"></div><br>
			<div id="message" class="message-info" style="display: inline;"></div>
		</div>
	</div>

<script type='module'>

	let messageTitle = document.querySelector( '#message-title' ) ;
	let message = document.querySelector( '#message' ) ;
	let exe = document.querySelector( '#exe' ) ;
	let usbDevice = '' ;
	let usbConfiguration = {} ;

	const DeviceFilter = [
		{ vendorId : 1356 , productId: 3528 },	// SONY PaSoRi RC-S300/S
		{ vendorId : 1356 , productId: 3529 },	// SONY PaSoRi RC-S300/P
	] ;

	exe.addEventListener( 'click', async () => {
		await usbDeviceConnect() ;
		console.log( usbDevice, usbConfiguration ) ;
		await usbDeviceOpen() ;
		await usbDeviceClose() ;
		return;
	});

//	USB デバイスコネクト
	var usbDeviceConnect = async () => {
		const ud = await navigator.usb.getDevices() ;						// ペアリング設定済みデバイスのUSBDeviceインスタンス取得
		let peared = 0 ;
		if ( ud.length > 0 ) {
			for( let dev of ud ) {
				const td = DeviceFilter.find( (fildev) => dev.vendorId == fildev.vendorId && dev.productId == fildev.productId ) ;
				if ( td !== undefined ) {
					++peared ;
					usbDevice = dev ;
				}
			}
		}
		if ( peared != 1 ) {
			usbDevice = await navigator.usb.requestDevice( { filters: DeviceFilter } ) ;	// USB機器をペアリングフローから選択しデバイスのUSBDeviceインスタンス取得
		}

		usbConfiguration.confValue = usbDevice.configuration.configurationValue ;
		usbConfiguration.interfaceNum = usbDevice.configuration.interfaces[ usbConfiguration.confValue ].interfaceNumber ;	// インターフェイス番号
		let ep = getEndPoint( usbDevice.configuration.interfaces[ usbConfiguration.confValue ] , 'in' ) ;	// 入力エンドポイントを求める
		usbConfiguration.endPointInNum = ep.endpointNumber ;												// 入力エンドポイント
		usbConfiguration.endPointInPacketSize = ep.packetSize ;												// 入力パケットサイズ
		ep = getEndPoint( usbDevice.configuration.interfaces[ usbConfiguration.confValue ] , 'out' ) ;		// 出力エンドポイントを求める
		usbConfiguration.endPointOutNum = ep.endpointNumber ;												// 出力エンドポイント
		usbConfiguration.endPointOutPacketSize = ep.packetSize ;											// 出力パケットサイズ

		return;
	}

//	USB デバイスオープン
	var usbDeviceOpen = async() => {
		await usbDevice.open() ;		// USBデバイスセッション開始
		await usbDevice.selectConfiguration( usbConfiguration.confValue ) ;		// USBデバイスの構成を選択
		await usbDevice.claimInterface( usbConfiguration.interfaceNum ) ;		// USBデバイスの指定インターフェイスを排他アクセスにする

		return ;
	}

//	USB デバイスクローズ
	var usbDeviceClose = async() => {
		await usbDevice.releaseInterface( usbConfiguration.interfaceNum ) ;		// USBデバイスの指定インターフェイスを排他アクセスを解放する
		await usbDevice.close() ;		// USBデバイスセッション終了

		return ;
	}

//	USBデバイス Endpoint の取得
	var getEndPoint = ( argInterface, argVal ) => {
		let retVal = false ;
		for( const val of argInterface.alternate.endpoints ) {
			if ( val.direction == argVal ) { retVal = val ; }
		}
		return retVal ;
	}

</script>
</body>
</html>
これで、非接触ICカードリーダー/ライター SONY PaSoRi RC-300 とのデータの送受信準備ができました。
USBデバイスとのデータ送受信
USBデバイスとのデータ送受信には、USBDevice.transferOut() 送信・USBDevice.transferIn() 受信を使います。
MDN References > Web API > USBDevice > USBDevice.transferOut()
MDN References > Web API > USBDevice > USBDevice.transferIn()
リクエストデータの送信( USBDevice.transferOut )の引数は TypedArray (型付き配列)にてバイナリデータとして渡されます。
MDN 開発者向けのウェブ技術 > JavaScript > JavaScript 型付き配列
MDN 開発者向けのウェブ技術 > JavaScript > JavaScript リファレンス > 標準組み込みオブジェクト > TypedArray
レスポンスデータの受信( USBDevice.transferIn )の返り値は USBInTransferResult オブジェクトが返ります。
USBInTransferResult = {
  status : "ok" // (String) "ok":正常 "stall":エンドポイントエラー "babble":多くのデータで応答
  data: // (DataView)
}
MDN References > Web APIs > USBInTransferResult
MDN 開発者向けのウェブ技術 > JavaScript > JavaScript リファレンス > 標準組み込みオブジェクト > DataView
単純なUSBデバイスとのデータ送受信
オープン処理とクローズ処理に、リクエストコマンド送信とコマンド実行結果を受け取る処理を追加します。
オープン処理には、トランスミッションの終了・開始で、リクエスト受付準備をし、RFのオフ・オンを実行してメモリをクリアします。
クローズ処理には、トランスミッションの終了とRFのオフを実行します。
各コマンドは、必要なヘッダーをつけた状態ですので、そのままデータ送信します。
画面表示のロジックや型変換のロジックが増えたため、急にステップ数が増えましたが、内容的には上記の単純なリクエストとレスポンスのやり取りが増えただけです。
<!DOCTYPE HTML PUBLIC "-//W3C//DTD HTML 4.01 Transitional//EN"
"http://www.w3.org/TR/html4/loose.dtd">
<html>
<meta http-equiv="content-type" content="text/html; charset=utf-8">
<head>
<title>USBDevice Test</title>
<style>
.textCenter { text-align: center ; }
.smfont { font-size: 0.7em; }
</style>
</head>
<body>
<h3>
<div class="header-title textCenter">
USBDevice Test
</div>
</h3>
<div class="mainArea">
<div class="button textCenter">
<button id="exe">Execute</button>
</div>
<br><br>
<div class="message">
<div id="message-title" class="message-title" style="display: inline;"></div><br>
<div id="message" class="message-info smfont" style="display: inline;"></div>
</div>
</div>
<script type='module'>
let messageTitle = document.querySelector( '#message-title' ) ;
let message = document.querySelector( '#message' ) ;
let exe = document.querySelector( '#exe' ) ;
let usbDevice = '' ;
let usbConfiguration = {} ;
const DeviceFilter = [
{ vendorId : 1356 , productId: 3528 }, // SONY PaSoRi RC-S300/S
{ vendorId : 1356 , productId: 3529 }, // SONY PaSoRi RC-S300/P
] ;
exe.addEventListener( 'click', async () => {
await usbDeviceConnect() ;
console.log( usbDevice, usbConfiguration ) ;
await usbDeviceOpen() ;
await usbDeviceClose() ;
return;
});
// USB デバイスコネクト
var usbDeviceConnect = async () => {
const ud = await navigator.usb.getDevices() ; // ペアリング設定済みデバイスのUSBDeviceインスタンス取得
let peared = 0 ;
if ( ud.length > 0 ) {
for( let dev of ud ) {
const td = DeviceFilter.find( (fildev) => dev.vendorId == fildev.vendorId && dev.productId == fildev.productId ) ;
if ( td !== undefined ) {
++peared ;
usbDevice = dev ;
}
}
}
if ( peared != 1 ) {
usbDevice = await navigator.usb.requestDevice( { filters: DeviceFilter } ) ; // USB機器をペアリングフローから選択しデバイスのUSBDeviceインスタンス取得
}
usbConfiguration.confValue = usbDevice.configuration.configurationValue ;
usbConfiguration.interfaceNum = usbDevice.configuration.interfaces[ usbConfiguration.confValue ].interfaceNumber ; // インターフェイス番号
let ep = getEndPoint( usbDevice.configuration.interfaces[ usbConfiguration.confValue ] , 'in' ) ; // 入力エンドポイントを求める
usbConfiguration.endPointInNum = ep.endpointNumber ; // 入力エンドポイント
usbConfiguration.endPointInPacketSize = ep.packetSize ; // 入力パケットサイズ
ep = getEndPoint( usbDevice.configuration.interfaces[ usbConfiguration.confValue ] , 'out' ) ; // 出力エンドポイントを求める
usbConfiguration.endPointOutNum = ep.endpointNumber ; // 出力エンドポイント
usbConfiguration.endPointOutPacketSize = ep.packetSize ; // 出力パケットサイズ
return;
}
// USB デバイスオープン
var usbDeviceOpen = async() => {
message.innerHTML += '**OPEN<br/>' ;
await usbDevice.open() ; // USBデバイスセッション開始
await usbDevice.selectConfiguration( usbConfiguration.confValue ) ; // USBデバイスの構成を選択
await usbDevice.claimInterface( usbConfiguration.interfaceNum ) ; // USBデバイスの指定インターフェイスを排他アクセスにする
// RC-S300 コマンド
const endTransparent = new Uint8Array( [ 0x6B, 0x08, 0x00, 0x00, 0x00, 0x00, 0x01, 0x00, 0x00, 0x00, 0xFF, 0x50, 0x00, 0x00, 0x02, 0x82, 0x00, 0x00 ] ) ;
const startransparent = new Uint8Array( [ 0x6B, 0x08, 0x00, 0x00, 0x00, 0x00, 0x02, 0x00, 0x00, 0x00, 0xFF, 0x50, 0x00, 0x00, 0x02, 0x81, 0x00, 0x00 ] ) ;
const turnOff = new Uint8Array( [ 0x6B, 0x08, 0x00, 0x00, 0x00, 0x00, 0x03, 0x00, 0x00, 0x00, 0xFF, 0x50, 0x00, 0x00, 0x02, 0x83, 0x00, 0x00 ] ) ;
const turnOn = new Uint8Array( [ 0x6B, 0x08, 0x00, 0x00, 0x00, 0x00, 0x04, 0x00, 0x00, 0x00, 0xFF, 0x50, 0x00, 0x00, 0x02, 0x84, 0x00, 0x00 ] ) ;
let res ;
await sendUSB( endTransparent, 'End Transeparent Session' ) ;
res = await recvUSB( 64 ) ;
await sendUSB( startransparent, 'Start Transeparent Session' ) ;
res = await recvUSB( 64 ) ;
await sendUSB( turnOff, 'Turn Off RF' ) ;
await sleep( 50 ) ;
res = await recvUSB( 64 ) ;
await sleep( 50 ) ;
await sendUSB( turnOn, 'Turn On RF' ) ;
await sleep( 50 ) ;
res = await recvUSB( 64 ) ;
await sleep( 50 ) ;
return ;
}
// USB デバイスクローズ
var usbDeviceClose = async() => {
message.innerHTML += '**CLOSE<br/>' ;
// RC-S300 コマンド
const endTransparent = new Uint8Array( [ 0x6B, 0x08, 0x00, 0x00, 0x00, 0x00, 0x05, 0x00, 0x00, 0x00, 0xFF, 0x50, 0x00, 0x00, 0x02, 0x82, 0x00, 0x00 ] ) ;
const turnOff = new Uint8Array( [ 0x6B, 0x08, 0x00, 0x00, 0x00, 0x00, 0x06, 0x00, 0x00, 0x00, 0xFF, 0x50, 0x00, 0x00, 0x02, 0x83, 0x00, 0x00 ] ) ;
let res ;
await sendUSB( turnOff, 'Turn Off RF' ) ;
await sleep( 50 ) ;
res = await recvUSB( 64 ) ;
await sleep( 50 ) ;
await sendUSB( endTransparent, 'End Transeparent Session' ) ;
res = await recvUSB( 64 ) ;
await usbDevice.releaseInterface( usbConfiguration.interfaceNum ) ; // USBデバイスの指定インターフェイスを排他アクセスを解放する
await usbDevice.close() ; // USBデバイスセッション終了
return ;
}
// USBデバイスへデータを渡す
var sendUSB = async( argData, argProc = '' ) => {
await usbDevice.transferOut( usbConfiguration.endPointOutNum, argData ) ;
const dataStr = arrayToHex( argData ) ;
console.log( dataStr ) ;
message.innerHTML += 'SEND (' + argProc + ')<br/> --> [ ' + dataStr + ']<br/>' ;
}
// USBデバイスからデータを受け取る
var recvUSB = async( argLength ) => {
const res = await usbDevice.transferIn( usbConfiguration.endPointInNum, argLength ) ;
const resStr = binArrayToHex( res.data ) ;
console.log( res ) ;
message.innerHTML += 'RECV Status[' + res.status + ']<br/> <-- [ ' + resStr + ']<br/>' ;
return res ;
}
// USBデバイス Endpoint の取得
var getEndPoint = ( argInterface, argVal ) => {
let retVal = false ;
for( const val of argInterface.alternate.endpoints ) {
if ( val.direction == argVal ) { retVal = val ; }
}
return retVal ;
}
// Dataviewから配列への変換
var dataviewToArray = ( argData ) => {
let retVal = new Array( argData.byteLength ) ;
for( let i = 0 ; i < argData.byteLength ; ++i ) {
retVal[i] = argData.getUint8(i) ;
}
return retVal ;
}
// DataViewの8ビットバイナリを16進数で返します。
var binArrayToHex = ( argData ) => {
let retVal = '' ;
let temp = [] ;
for ( let idx = 0 ; idx < argData.byteLength ; idx++) {
let bt = argData.getUint8( idx ) ;
let str = bt.toString(16) ;
str = bt < 0x10 ? '0' + str : str ;
retVal += str.toUpperCase() + ' ' ;
}
return retVal ;
}
// 配列の要素を16進数で返します。
var arrayToHex = ( argData ) => {
let retVal = '' ;
let temp = [] ;
for ( let val of argData ) {
let str = val.toString(16) ;
str = val < 0x10 ? '0' + str : str ;
retVal += str.toUpperCase() + ' ' ;
}
return retVal ;
}
// スリープ
var sleep = async (msec) => {
return new Promise(resolve => setTimeout(resolve, msec));
}
</script>
</body>
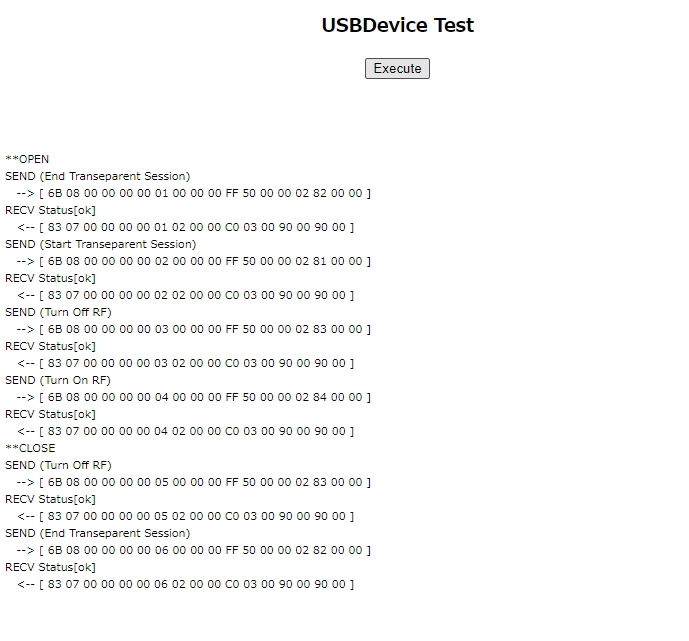
</html>画面の「Execute」ボタンをクリックして、コネクト・オープン・クローズを実行して、transferOut と transferIn の状況が画面に表示されます。

それぞれの、コマンドに対して正常を示すデータが返ってきています。
※レスポンスに関しては次回説明しますが、レスポンス値がないリクエストへのレスポンスは、
「 83 07 00 00 00 00 01 02 00 00 C0 03 00 90 00 90 00 」
が、戻っていれば正常だと考えてください。
但し、レスポンスの7バイト目は、リクエストコマンドの7バイト目がそのまま返りますので、リクエストコマンドににより変化します。
各コマンドの内容は後に回すとして、これで非接触ICカードリーダー/ライター SONY PaSoRi RC-S300 へのデータの受け渡し(送受信)が、確認できました。
Web APIs USBDevice のまとめ
これで、Web APIs USBDevice のおおまかな利用方法は理解できたでしょうか。
流れとしては
USB.requestDevice() または USB.getDevices()
● USBDevice インスタンスを取得する。
USBDevice インスタンス
● コンフィグレーション値・インターフェイス番号・エンドポイントを求める。
USBDevice.open()
● USBデバイスセッション開始
USBDevice.selectConfiguration()
● USBデバイスの構成を選択・・・コンフィグレーション値
USBDevice.claimInterface()
● USBデバイスの指定インターフェイスを排他アクセスにする・・・インターフェイス番号
USBDevice.transferOut()
● USBデバイスにデータを送信・・・エンドポイント
USBDevice.transferIn()
● USBデバイスからデータを受信・・・エンドポイント
USBDevice.releaseInterface()
● USBデバイスの指定インターフェイスを排他アクセスを解放する・・・インターフェイス番
USBDevice.close()
● USBデバイスセッション終了
という感じです。
次回
次回は、非接触ICカードリーダー/ライター SONY PaSoRi RC-S300 のコマンドを説明する予定です。
FeliCa Lite-S操作モジュール ArukasNFCLiteS
「FeliCa Lite-S操作モジュール ArukasNFCLiteS」の紹介
JavaScript からこのモジュールを利用すれば、非接触ICカードリーダー/ライター SONY PaSoRi RC-S300へのコネクト・ポーリング・FeliCa Lite-S カードへの読み書きが簡単にできます。
動作確認は、
OS:Windows10 Pro・Windows10 Home
ブラウザ: Chrome・Edge
で行っています。
動作ハード確認は、Atom x5-Z8350 という低スペック PC でも動作しました。
ダウンロード
ダウンロードにあたり下記事項を確認してダウンロードしてください。
解凍後には必ず「JavaScript FeliCa Lite-S操作モジュール.txt」を一読し、免責・禁止事項・注意事項をご確認ください。交通系カードや電子マネーカードを使って、データが壊れたとかの責任は一切受け付けません。
・免責
当モジュール及びサンプルプログラムによるいかなる損害も、有限会社さくらシステム及び製作者はその責を一切負いません。
・禁止事項
有限会社さくらシステム及び製作者に許可なく、あらゆるメディア・コンテンツに再掲することを禁じます。
・注意事項
当モジュール及びサンプルプログラムは、技術検証を目的として作成されていますので、負荷試験を始めとする製品化を行うための基準を満たすための試験を一切行っておりませんので、予期せぬ結果を招く場合があります。
その場合であっても、上記免責事項により有限会社さくらシステム及び製作者はその責を一切負いません。
使用方法
ダウンロードした zip ファイルを解凍すると NFC フォルダが作成されますので、適当なWebサーバへアップロードしてください。
Web APIs USBDevice に対応したブラウザからサンプルへアクセスすることで、動作を確認することができます。
詳しくは、NFC フォルダ内の「JavaScript FeliCa Lite-S操作モジュール.txt」を参照してください。
